"I liked saving money buying 4 pairs at a time and the socks are great for what I need. It's unbelievable how they could be made out of this material, yet they are so comfortable and they don't make my feet and legs itch nor do they make them hot or sweaty."
Rick S., Verified Customer
Layering Socks For Blister Prevention: Guide
Share
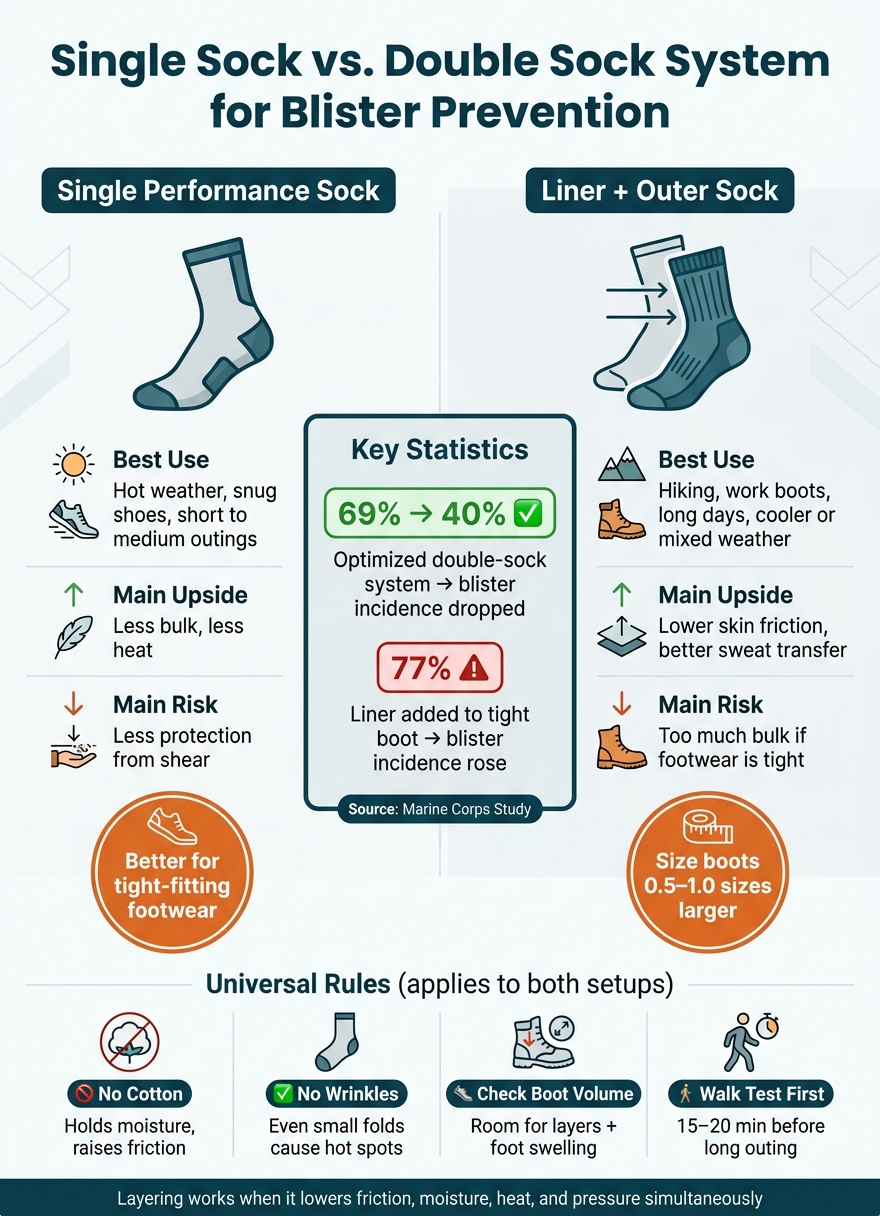
A two-sock setup can cut blister risk - but only if your shoes have enough room. In one Marine study, an optimized double-sock system dropped blister incidence from 69% to 40%, while adding a liner to a tight boot pushed it up to 77%.
If I want the short answer, it’s this:
Use a thin, smooth liner to move sweat off my skin
Stop at the first hot spot and fix it before it turns into a blister
Here’s the simple rule: layering works when it lowers friction, moisture, heat, and pressure at the same time. If two socks make my feet hotter or more cramped, one good performance sock is the better pick.
A fast way to think about it:
Setup
Best use
Main upside
Main risk
Single performance sock
Hot weather, snug shoes, short to medium outings
Less bulk, less heat
Less protection from shear
Thin liner + outer sock
Hiking, work boots, long days, cooler or mixed weather
Lower skin friction, better sweat transfer
Too much bulk if footwear is tight
So before I head out, I want dry materials, no wrinkles, enough toe room, and a short walk test. That’s the whole system in plain terms.
Single Sock vs. Double Sock System for Blister Prevention
Why wearing two pairs of socks could prevent blisters while hiking
sbb-itb-855989e
How to Choose Your Inner and Outer Socks
Once fit is dialed in, the next step is picking layers that handle moisture, friction, and pressure as a system. In a two-sock setup, each sock has its own job. The inner sock sits against your skin and helps cut down friction there. The outer sock takes on shear, adds cushioning, and moves with the boot instead of rubbing against your foot. That’s what helps keep friction off your skin.
Inner Sock: Thin, Smooth, and Moisture-Wicking
Your inner sock should fit close to the skin with no wrinkles and no bunching. Even a small fold can turn into a pressure point fast.
For materials, stick with a hydrophobic synthetic like polypropylene, Coolmax, or polyester, or use a thin merino wool blend. These fibers pull sweat away from your skin and move it into the outer sock, which helps keep the skin surface drier. Avoid cotton vs wool vs alpaca comparisons entirely when choosing a liner; cotton is a poor choice. Cotton soaks up moisture and holds it against the skin, which increases friction and blister risk a lot.
Outer Sock: Cushioned, Breathable, and Secure
The outer sock handles cushioning and shear. It should move with the boot, not with your foot. It also needs to feel secure without feeling tight. Look for reinforced cushioning in the heel and toe box, and make sure the fabric breathes well enough to limit heat and moisture buildup. When skin gets hot and damp, it softens, and blister risk goes up.
Alpaca fiber works well in this layer. Suri Performance Alpaca Socks fit this role well because alpaca wicks moisture, resists odor, and regulates temperature, which makes it a good pick for long hikes, full workdays, and shifting temperatures.
Match Sock Thickness to Your Footwear
This is where many people mess it up. If your footwear already fits snugly, adding a liner can crowd the foot. Too much sock in too little space compresses the foot, limits blood flow, and increases blister risk. One study found that adding a liner to a tight-fitting boot pushed blister incidence up to 77%.
If you plan to wear a double-sock system, size your boots 0.5 to 1.0 sizes larger than your usual fit. You also need to leave room for swelling. Feet can grow by half a size or more over a full day of activity, so aim for about a thumb-width of space - roughly 0.5 inches - between your longest toe and the front of the boot.
Before you head out, do a quick check for wrinkles, pressure points, and any sign of crowding.
How to Check Fit Before You Head Out
Once you’ve got the right sock sizes, do one more check before you leave. This only takes a few minutes, and it can save you a lot of pain later.
A sock can seem fine when you’re standing still, then start bunching, sliding, or pinching the second you begin walking. So before any hike, long walk, or work shift, test the full sock setup in motion.
Check for Wrinkles, Bunching, and Seam Pressure
Start with the inner liner. Run your hand over the heel, arch, and toe area, and smooth out any folds. Wrinkles create hot spots fast.
Make sure both heel cups are lined up well. The fabric should sit squarely over your heel, not pulled toward the arch or riding up toward the Achilles. If a seam feels raised, flip the liner inside out.
After both layers are on and smoothed out, check the cuff height. The top edge should sit above the collar of your boot or shoe. If the sock edge falls below the collar, the shoe can rub right against your skin.
Keep Layers Snug, Not Tight
The liner should fit like a second skin, with no loose fabric. The outer sock should feel secure, but it shouldn’t squeeze your foot.
Once both layers are on, stand up and walk a few steps. The liner should move with your foot. If both layers move as one, the fit is too tight.
A few warning signs are easy to spot:
Numbness or tingling means the fit is too tight
Heel slipping usually means the heel cup needs adjustment
Arch bunching often means the liner is too large
If you can, walk for 15–20 minutes before you start. That short test helps you catch pressure points early.
Layering Order and Mid-Activity Adjustments
Even a solid sock setup can fall apart once you start moving.
Put the Inner Sock On First, Then the Outer Sock
Start with the inner sock. Smooth it out from toe to heel so it sits snug against your skin without wrinkles, then add the outer sock. After you lace up, do a quick check: the liner should stay flat, and the outer sock shouldn't bunch or slide around.
Once you get moving, heat and moisture are usually the first signs that something's off.
Stop Early When You Feel Hot Spots or Damp Socks
A hot spot is the last warning before a blister forms. The second you feel one, stop right away.
Take off your shoes or boots and remove your socks. Check your skin, then look for the cause: a wrinkle, grit, or built-up moisture. Cover the spot with blister padding or tape as soon as you find it, and round the corners so it doesn't peel off halfway through your activity. If your socks feel damp or sticky, change into a dry pair and let your feet air out for five minutes before you lace back up.
Avoid Over-Layering in Hot or Tight Conditions
Two layers aren't always better than one. In hot weather, extra fabric can trap heat and sweat. In that case, one thin merino wool or moisture-wicking socks often works better because it lets more air move through.
Fit matters just as much. If your boot already feels snug, adding a liner can make things worse. In one case, blister rates went up to 77%, compared with 69% with a single sock, because the extra thickness created too much bulk inside the boot. If your toes feel numb or cramped, take out the liner and loosen the laces to help blood flow and airflow. If your heel is slipping, tighten the top laces to lock it in place. If the toe box feels cramped, skip the forefoot eyelets to ease pressure.
Conclusion: Build a Sock System That Works for You
No sock setup works for every foot, boot, or trail. The right mix depends on your footwear volume, the weather, your activity level, and the shape of your feet.
At this stage, the goal isn't more gear. It's getting the right mix of fit, moisture control, and low-friction layers. The basic idea stays the same: move friction away from your skin with a thin inner sock, a cushioned outer sock, and enough room for both layers to do their job.
Key Takeaways for Blister Prevention
Use this quick checklist to keep that system working on the trail.
Avoid cotton in any layer. It holds moisture, loses shape, and increases friction. Stick with synthetics, silk, or merino wool.
Keep both layers wrinkle-free. One small fold can turn into a hot spot.
Leave enough boot volume for two layers and normal foot swelling.
Test the setup on a short walk before a long outing.
At the first sign of warmth, tenderness, or irritation, stop and fix it.
For the outer layer, Suri Performance Alpaca Socks offer moisture-wicking, odor-resistant, thermo-regulating alpaca performance for a two-layer system.
FAQs
How do I know if my boots have enough room for two socks?
Do a fit test before you head out. Put on your thin liner sock and thicker outer sock, then try on your boots. You want enough space in the toe box and across the instep so your feet don’t feel squeezed or lose circulation.
Your laces should cinch up snugly without pressing the sock layers too hard or creating hot spots. If your feet feel cramped, numb, or too warm, your boots are too tight for this setup. Try everything on during a short hike first.
When is one sock better than a layered sock system?
One sock is often the better call when the pair is built well and fits the way it should. Modern high-density knitting and built-in fibers, like the ones in Suri Performance Alpaca Socks, can handle moisture, friction, and cushioning without the extra bulk or sizing changes that come with layering.
Layering can still help if your footwear doesn’t fit quite right or you’re dealing with a specific hot spot. But with a properly fitted single sock, you’re less likely to get bunching, and you avoid the tighter feel that extra sock volume can create inside boots.
What should I do if I feel a hot spot mid-hike?
Stop right away. A hot spot is an early warning sign, and if you keep walking, you’re more likely to end up with a blister.
Check your feet, socks, and laces for bunching or pressure points. Then fix anything that’s rubbing to cut down on friction. If you have one, put on a blister pad or use a lubricant. You can also air out your feet for five minutes before you keep going.