"I liked saving money buying 4 pairs at a time and the socks are great for what I need. It's unbelievable how they could be made out of this material, yet they are so comfortable and they don't make my feet and legs itch nor do they make them hot or sweaty."
Rick S., Verified Customer
Hiking Socks Fit Guide: Avoid Blisters
Share
Blisters are a common hiking issue, often caused by poorly fitting socks rather than your boots. The right socks can help you avoid friction, pressure, and moisture - key factors that lead to blisters. Here’s what you need to know:
Fit: Socks should feel snug, with no wrinkles or bunching. They shouldn’t leave marks or compress your toes.
Thickness: Match sock thickness to your trail conditions. Lightweight for warm weather, midweight for mixed terrain, and heavyweight for cold or rugged hikes.
Height: Choose a height that extends above your boot collar to prevent rubbing.
Testing: Always test socks with your boots before hitting the trail. Look for signs of discomfort like heel slip, toe compression, or hot spots.
Socks like Suri Performance Alpaca Socks are designed to address these issues, offering moisture control, cushioning, and a secure fit. Proper sock selection and fit can make all the difference for blister-free hiking adventures.
How to Get the Right Hiking Sock Fit
What a Good Fit Looks Like
A well-fitting hiking sock should feel snug, almost like a second skin, without any loose fabric or bunching that could lead to discomfort or blisters. It’s important that the sock doesn’t leave marks on your skin, cause numbness, or make your toes tingly. A smooth, wrinkle-free fit is key to minimizing friction.
Pay close attention to the heel cup - it should sit neatly on your heel without slipping under your foot or creeping up toward your Achilles. For the toe area, there should be enough space to wiggle your toes without the fabric pulling tight, especially when walking downhill. Your toes shouldn’t feel cramped or pushed together. Around the midfoot, many performance hiking socks feature gentle compression or arch support zones. These help the sock stay in place, reducing movement inside your boot and lowering the risk of blisters during long hikes.
Using Size Charts and Foot Measurements
Start by measuring the length of your foot in inches and noting your usual U.S. shoe size. Compare these measurements to the manufacturer’s size chart, which typically groups socks into categories like S/M/L based on shoe size ranges - for example, Men’s 8–9.5 or Women’s 7–9.5. If you find yourself between sizes, it’s usually better to go with the smaller size for a snug, performance fit, as long as your toes have enough room and the sock isn’t overstretched.
Once you’ve chosen a size, check that the heel knit aligns with your heel and the cuff reaches the right height on your leg. If the heel sits too low and extra fabric gathers at the toes, the sock is too big. On the other hand, if the heel rides up onto your Achilles, the sock is too small. When buying online, look for technical socks - like Suri Performance Alpaca Socks - that provide detailed size charts based on U.S. shoe sizes. Socks with stretch materials like nylon or spandex are especially helpful for accommodating slight differences in foot length and width.
After choosing a size, it’s a good idea to test the fit at home.
Testing Your Socks at Home
Try your socks on with your hiking boots and wear them for 20–30 minutes during regular activity. Then, take a few trips up and down a flight of stairs. Pay attention to how the socks feel - does your heel lift inside the sock or boot? Does the sock slide down, or do your toes hit the front of the boot during descents? Any of these issues could lead to blisters on your toes or heels.
If possible, test the socks on an incline to see if the fit shifts. Watch for hot spots, which are warm or tender areas that could develop into blisters. If you notice a hot spot during testing, stop and inspect your socks. Look for wrinkles in the heel or toe areas, a twisted sock, or a cuff that has slipped down and created excess fabric in your boot. Adjust as needed by repositioning the sock, re-lacing your boots for better heel support, or switching to a different sock thickness.
Finally, after removing the socks, check for red patches, deep cuff lines, or pressure marks around your nails. These signs indicate areas that may need further adjustment.
Fine-tune the fit until you’re confident in your comfort before heading out on your hike.
This is why you get BLISTERS when Hiking 🤕
Choosing Sock Thickness, Height, and Cushioning
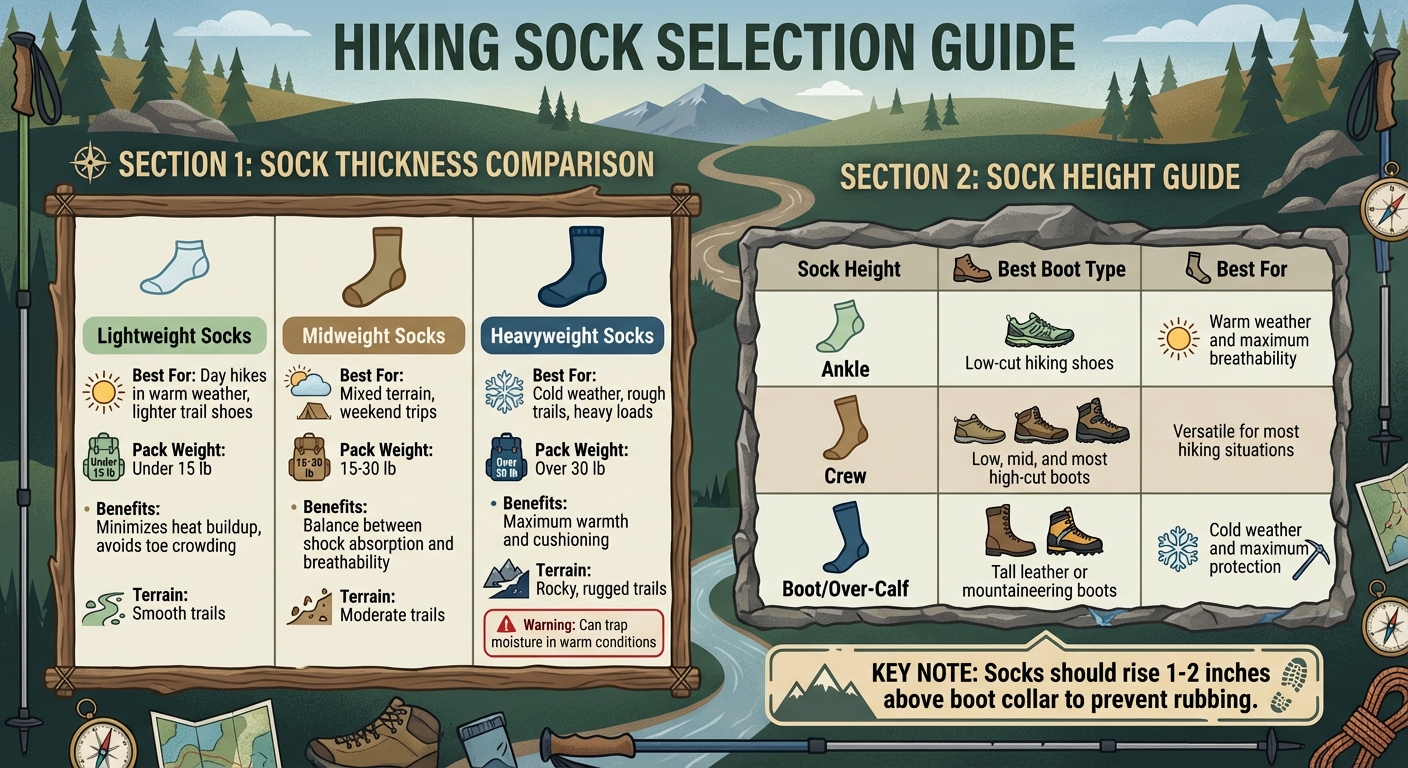
Hiking Sock Thickness and Height Selection Guide
Picking the Right Thickness and Cushioning Level
Hiking socks generally come in three cushioning options: lightweight, midweight, and heavyweight. Each type serves a specific purpose and can impact how your boots fit.
Lightweight socks are ideal for day hikes in warm weather and pair well with lighter trail shoes. They help minimize heat buildup and avoid crowding your toes. Midweight socks, with moderate cushioning, are a solid choice for mixed terrain and weekend trips. They strike a balance between shock absorption and breathability, making them suitable for carrying a moderate pack (15–30 lb). Heavyweight socks, on the other hand, are built for cold weather, rough trails, and heavier loads (over 30 lb). However, in warm conditions or with snug boots, their extra padding can trap moisture and cause pressure points, increasing the risk of blisters.
When selecting socks, think about the terrain and weather you'll encounter. On smooth trails with lighter loads, light or medium cushioning will do the job. For rocky terrain, extra padding under the heel and ball of the foot can absorb shock and prevent hotspots. In hot and humid climates, thinner socks with moisture-wicking fibers reduce sweat and friction. Cooler weather calls for thicker socks that provide warmth without bunching.
Look for socks with targeted cushioning in high-friction areas like the heel, ball of the foot, and Achilles. This design protects key areas while keeping the arch and instep thinner for a snug, glove-like fit.
Matching Sock Height to Your Boots
The height of your hiking socks matters just as much as their cushioning. Your socks should rise at least 1–2 inches above your boot or shoe collar to avoid rubbing against your skin.
No-show or low-cut socks work only for trail runners or low-cut hiking shoes, as they leave the ankle exposed when paired with proper hiking boots. Ankle socks are better for low or mid-cut boots in warm weather, offering enough coverage to prevent chafing while maintaining a streamlined look. Crew socks, which extend to mid-calf, are a versatile choice. They shield your ankles and lower calves from boot collars and trail debris, making them suitable for most hiking scenarios. For tall leather boots or cold-weather mountaineering footwear, boot-height (or over-calf) socks are the way to go. Their extended length protects your skin from contact with the boot top and adds extra warmth.
Sock Height
Best Boot Type
Best For
Ankle
Low-cut hiking shoes
Warm weather and maximum breathability
Crew
Low, mid, and most high-cut boots
Versatile for most hiking situations
Boot/Over-Calf
Tall leather or mountaineering boots
Cold weather and maximum protection
When trying on hiking boots, use crew-height socks to ensure the boot collar doesn't rub against your skin.
With these tips in mind, let’s explore how Suri Performance Alpaca Socks cater to different hiking environments.
Suri Performance Alpaca Socks are crafted from alpaca fiber, a material celebrated for its ability to wick moisture, regulate temperature, and resist odors - similar to Merino wool. These features help keep your feet dry and comfortable, no matter the conditions.
Their sock lineup includes crew and boot socks, each tailored to specific hiking needs. Crew socks offer light compression zones and mid-calf coverage, making them a perfect match for low and mid-cut boots during day hikes or weekend trips. For colder weather, rugged trails, or longer treks, boot socks provide dense cushioning and reinforced zones under the heel, ball of the foot, and Achilles for added durability. For warm-weather hikes or low-cut shoes, their ankle socks combine targeted cushioning with breathable mesh zones, ensuring a cooler, more relaxed fit.
Thanks to the natural stretch of alpaca fiber, these socks conform closely to your feet, reducing bunching and friction - two major culprits behind blisters. Whether you’re heading out for a summer hike with a light pack or tackling a winter trail with heavier gear, choosing the right sock height and cushioning can make all the difference in keeping your feet comfortable and protected.
sbb-itb-855989e
Fixing Common Sock Fit Problems
Let’s tackle some common sock fit issues and explore how to address them effectively.
Stopping Bunching, Wrinkles, and Sliding
Bunching and wrinkles in socks often happen because of extra fabric or improper alignment. These folds create pressure points that rub against your skin with every step, quickly turning into painful hot spots. Sliding, on the other hand, is usually caused by socks that are too loose or have lost their elasticity, leaving your skin exposed to boot seams.
To avoid these problems, take a moment to position your socks correctly before putting on your boots. Make sure the heel cup of the sock aligns with your actual heel, then smooth the fabric forward from the heel to the toes. Pull any excess material upward toward the ankle, and ensure the seams lie flat across the base of your toes - not over the nail edges. After lacing your boots, double-check that everything is in place. If you notice bunching while hiking, stop, take off your boot, adjust the sock, and re-lace your boots evenly.
Choosing socks with a snug, performance fit can make a big difference - they should feel like a second skin, reducing unnecessary movement. Also, match your sock thickness to your boot's fit. Thick socks in tight boots or thin socks in roomy boots can lead to bunching. As Mark P., a carpenter, shared:
I used to go through socks every few weeks - these have lasted months without thinning or sagging. No more sweaty feet, and they actually stay up in my boots. Worth every penny.
Next, let’s address two other common trouble spots: the heel and toe.
Preventing Heel Slip and Toe Compression
Heel slip occurs when your heel lifts with every step, causing repeated rubbing on the back of your heel and Achilles. This often means your sock and boot combination has too much room around the ankle. To fix this, try slightly thicker socks or socks with built-in arch compression zones or left/right anatomical designs to keep the fabric anchored to your foot. You can also use a heel-lock lacing technique to secure the ankle area without tightening the forefoot too much.
Toe compression, on the other hand, happens when socks are too short or boots are too tight, pulling the fabric tightly over your toenails and creating pressure. This becomes even worse on downhill hikes, as your toes are pushed into the front of the boot. Opt for socks that sit flat over your toes with a bit of stretch, and look for seamless toe closures to avoid irritating ridges. Make sure your boots have about a half-inch of space in front of your longest toe, and use lacing techniques to secure your heel and midfoot, preventing your foot from sliding forward on descents.
Now that we’ve covered fit, let’s focus on keeping your feet dry - another key factor in blister prevention.
Controlling Moisture and Heat
Wet socks are a major culprit when it comes to blisters. As your feet sweat, the moisture creates a slippery environment, increasing friction between your skin and the sock. Studies show that higher temperatures inside your boots and faster walking speeds lead to more perspiration and skin-to-sock friction, both of which contribute to blister formation. Moist skin sticks to the sock fabric while the underlying tissues move, creating shear forces that can harm the skin.
To minimize this risk, start every hike with clean, dry feet and moisture-wicking socks made from performance fibers like wool, synthetics, or alpaca. Avoid cotton - it soaks up moisture and holds onto it. Always carry a spare pair of socks and switch to a dry pair if your current ones become damp. During breaks, let your feet and insoles air out to help sweat evaporate. In hot weather, choose lightweight socks with good ventilation to keep heat buildup in check.
Alpaca fibers are particularly effective at managing moisture. They wick sweat away from your skin and help regulate temperature, keeping your feet cooler in summer and warmer in colder conditions. Plus, they naturally resist odors, which is a big bonus for multi-day hikes. Products like Suri Performance Alpaca Socks take advantage of these properties, offering dry, comfortable feet no matter the trail conditions.
Step-by-Step Guide to Preparing Your Socks
Getting your socks ready is just as important as picking the right pair to avoid painful blisters. Here’s how to make sure your feet are trail-ready.
Getting Ready Before Your Hike
Start by taking care of your feet. Trim your toenails straight across, smooth the edges with a file, and use a pumice stone to soften any calluses. Then, apply a very light layer of moisturizer - just enough to prevent friction but not so much that your feet feel slippery.
Before putting on your socks, wash and thoroughly dry your feet. For the socks themselves, machine wash them in cold water using a mild detergent (skip the fabric softener), and either air-dry them or use a low-heat tumble dry to maintain their elasticity. Check for any signs of wear, like thinning fabric or small holes, especially in areas that experience the most friction.
Testing Socks with Your Boots
Once your socks are ready, make sure they work well with your boots. Test the combination indoors for about 30–60 minutes. If you can, include activities like climbing stairs to spot any issues like bunching, heel slippage, or toe compression. During this test, your feet might swell a little, so check that there’s about a thumb’s width of space at the front of your boots.
If your heel slides around, you may need to adjust your laces or even try a different sock size. Bunching under your arches? Look for socks with a contoured design or thinner cushioning. Walking briskly is a good way to detect any heat from friction, giving you a chance to reposition your socks or add a liner sock for extra protection, especially if your boots are stiff.
Once everything feels good indoors, you’ll be better prepared to make adjustments while out on the trail.
Adjusting Socks on the Trail
While hiking, take a moment every 10–15 minutes to remove your boots and let your feet breathe. Straighten your socks from the cuff, and adjust your boot laces - keep them snug around the midfoot and ankle but looser near the toes to accommodate swelling. Packing an extra pair or two of Suri Performance Alpaca Socks is a smart move. Weighing less than 4 oz combined, these socks are excellent at wicking moisture, dry faster than wool, and stay warm even when damp - perfect for swapping out during wet conditions.
If you feel a hot spot forming, act quickly. Put on a thin liner sock over clean, dry skin as soon as you notice any warmth or rubbing. Go for seamless liners made from materials like CoolMax or Merino wool. These should fit snugly, like a second skin, without bunching. The added layer can help minimize friction and keep blisters at bay.
Conclusion
Finding the right sock fit is just as crucial as picking the perfect boots when it comes to avoiding blisters on the trail. A snug, second-skin fit - without any bunching or wrinkles - keeps your feet comfortable, even over long distances. Combine that fit with the right sock thickness for your boots and weather conditions, and choose a height that fully covers any areas where your skin meets your footwear. This combination ensures your feet stay protected and irritation-free.
Beyond fit, common issues like heel slip, toe compression, and excess moisture can be managed with the right socks. Suri Performance Alpaca Socks tackle these problems with alpaca fiber that naturally wicks moisture, regulates temperature, and retains warmth even when damp. These socks also feature targeted cushioning in high-friction areas and a secure fit that prevents sliding - key elements to avoiding hot spots and blisters.
Test your socks with your boots before hitting the trail, always pack a spare pair, and address any hot spots as soon as they appear. Keep in mind that boots alone can’t prevent blisters - they need to work together with well-fitted, moisture-wicking socks. Treat your socks as essential gear, and you’ll enjoy more comfortable hikes with fewer painful interruptions.
FAQs
What sock thickness should I choose for different hiking conditions?
When it comes to sock thickness, it all boils down to the weather and the type of hike you’re tackling. For warm, dry weather or high-energy hikes, thinner socks are your best bet - they help keep your feet cool and comfortable. On the flip side, cold, wet, or rough conditions call for thicker socks. They offer extra insulation, cushioning, and protection against tough terrain.
To keep your feet happy and blister-free, look for socks made with moisture-wicking and thermo-regulating fabrics. These materials help manage sweat and temperature, ensuring your feet stay dry and comfortable no matter the trail.
Why is alpaca fiber a great choice for hiking socks?
Alpaca fiber is a fantastic material for hiking socks, offering moisture-wicking, odor-resistant, and thermo-regulating benefits. This means your feet stay dry, fresh, and comfortable no matter how demanding the trail gets. Plus, its natural softness and durability help minimize friction, reducing the risk of blisters and irritation during those long treks.
What’s more, alpaca fiber provides excellent insulation. It keeps your feet cozy in cold weather and cool when the temperature rises, making it a great choice for outdoor adventures in any season. With its mix of performance and comfort, it’s no wonder alpaca fiber is a go-to for dedicated hikers.
How can I stop my socks from bunching and causing blisters while hiking?
To avoid your socks bunching up and causing blisters, start by selecting the correct size. Socks that are either too loose or too tight can quickly lead to discomfort. Opt for pairs with seamless designs or flat-knit construction, as these features help cut down on friction. Choosing socks made from moisture-wicking materials, such as Suri Performance Alpaca Socks, is another smart move. These fabrics help keep your feet dry and comfortable, reducing the chances of blisters. For added stability, look for socks with reinforced heels and arches, which help them stay in place, even during long hikes.